In contrast to the traditional igari style, which keeps the majority of the color directly under the outer third of the eyes, I drag the color across my nose bridge and slightly further down onto the apple of my cheek.
Below are some examples of this blush placement:


I prefer to wear bold and noticeable blush, but the placement can be tweaked for a more natural look (as in the second photo above.) This blush technique takes a bit more time and a few more tools compared to the classic one color apple-of-cheek placement, but it's a great technique to have in your arsenal to switch it up.
What You'll Need

Basic supplies needed for this look
- Bronzer: that suits your skintone- keep it relatively neutral and matte, as you will want it to blend in with your skin
- Nude blush: Matte or slightly satin powder blush 1-2 shades deeper than your natural skintone
- Medium blush: Matte or satin powder blush 3-4 shades deeper than your natural skintone
- Pop of color blush: Matte or satin powder blush in a very vibrant/bright tone- stay away from anything with too much brown or gray in it
- Narrow blush brush: I suggest the Wayne Goss Air Brush or anything with similar head shape. Can substitute a flat paddle shaped foundation brush.
- Fluffy blush brush: Should still be a relatively small head- the Real Techniques blush brush is too large for this purpose. Can be natural fiber (squirrel, goat) or duofibre synthetic. I like the Suqqu Blush Brush best but Chikuhodo Z4 is a good option as well.
- Pointed blush brush (optional): Even narrower than the above two brushes, but with a pointed tip for precise dotting of color. Can substitute a large fluffy eyeshadow brush. I used the Wayne Goss 02 Powder Brush.
Please take special care to coordinate your blush colors. By that I mean you must match the temperature of your blush tones (warm, neutral, cool.) You do not want to have too much contrast in undertone because we are already working with variation in depth, so we will rely on the harmonious tones to carry the look.
If you use something like Hourglass Dim Infusion (a peachy orange nude) topped with NARS Dolce Vita (a rich neutral berry) you will not find it easy to create a harmonious and well-blended but intentional look. Mixing undertones in a complex blush look is possible, it's just not something to attempt before you've practiced the basics.
Before Beginning: Base Makeup
Complete your base routine with foundation or concealer, whatever you like. Take special care to set your foundation in the cheek, cheekbone, and nose area with plenty of powder. You do not want any tackiness or dewiness to remain.
Highlight in the normal fashion (tops of cheekbones) if you like. If you are using mostly luminous/satin blushes, skip this step.
Highlight in the normal fashion (tops of cheekbones) if you like. If you are using mostly luminous/satin blushes, skip this step.
 |
| Highlight (if desired!) |
Step 1: The Stripening
First, using your flat brush, apply your bronzer in a swiping motion. Skim the tops of your cheekbones and take it over your nose bridge. Concentrate color directly on the bridge of the nose, and along the outer edges of your cheeks. This is necessary for every look- not only "beach babe" ones. If you are after a very bronzey gold look that day, you can use two bronzers, layering a more intense orange one on top of the first neutral one.
 |
| Use horizontal tapping and swiping motions with bronzer |
Then take your nude blush and the same brush, and retrace the bronzer placement. Feel free to overlap or go outside the border you created, the bronzer will serve as a guide that allows for a fuzzy pre-blended edge with little extra work. Make sure to only use horizontal strokes. This will serve as the stabilizer for the more tricky vibrant colors you layer on top- the fact that it's a nude blush will mean it will blend itself without harsh borders.
 |
| Striping motions to apply your nude "blush base" |
Step 2: The Sculpting
Now comes time to add some dimension with your second blush color. This time pick up your fluffy brush and apply your second blush in tight, circular motions. Do not cover the entire area of color, but focus on the inner portions of the face. You can sweep/brush the color that you apply outward toward the cheekbone, but focus application on the inner cheeks near your nose bridge. You should also dot the color gently across the nose bridge so the blush on both sides of your face is joined.
 |
| Gentle swirling and soft sweeping |
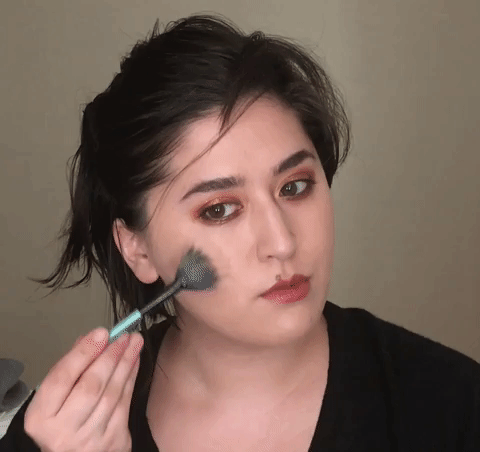
Step 3: The Pop
You can actually leave your blush as-is after Step 2. However I always add the final touch of a super vibrant blob of blush right under the iris of each eye. This makes the blush look very dimensional, and it also draws focus to your eyes, making them sparkle. The fresh "bloom" of color you see in all the photos at the top of this post are a result of using a saturated, scary blush, sparingly. Use a dotting motion, swirl slightly if needed. Usually very little buffing is necessary as you are placing it over a base of color, which means the edges of your bright blush won't look garish or unblended.
 |
| Adding a splash of vibrant blush finishes the look |
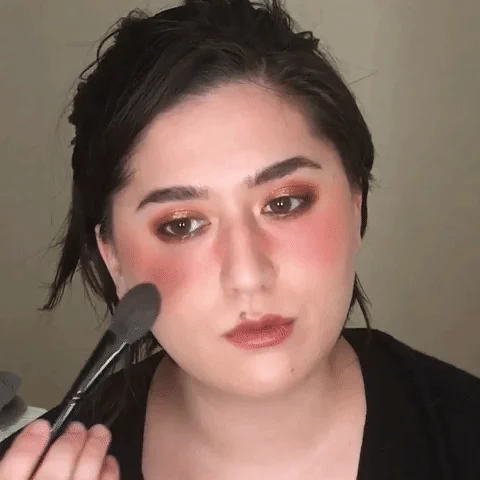
Step 4: Final Blend
If desired, take your original flat brush used for bronzer to smooth out the transitions. It is crucial to keep this step brief and light, because if you blend too vigorously, you will negate the use of multiple blushes, and you will find yourself with a completely uniform haze.
 |
| Keep final blend to a bare minimum |
I hope you enjoyed this tutorial and found it somewhat illuminating. I have been experimenting with this blush placement a lot this year and it is much more versatile than you might think. It also suits a wide variety of face shapes and noses, but individual exact placement will vary slightly. Experiment and let me know if you need suggestions or further pointers.
Please come visit me on Instagram and let me know what types of post you'd like me to do next!
This look is stunning on you. Thanks for the tutorial. I like the bolder colors, but I especially love the second picture where it looks like a totally natural flush.
ReplyDeleteThank you, Victoria! I definitely have occasions where I prefer to wear it natural as well, and I actually find that THIS placement (instead of the traditional apple cheek placement) lends itself really well to a no-makeup-makeup look :D
ReplyDeleteI love how you structured the tutorial to include Gifs of how you did each step! I'm going to try this technique.
ReplyDeleteI'm so happy you found it useful! I've always loved gif tutorials and pictorials best :D
DeleteThank you! This is such a useful tutorial. For some reason I can see only the first gif. Is it me or is it you? Still, the text instructions are very clear.
ReplyDeleteHmm, that's odd! I checked on multiple devices and it's working on my end! I hope you see them eventually. Glad you found it useful anyway :)
ReplyDeleteHi Lena, I am having the same issue as The Withdrawn. Only the first gif shows on my iPhone (using Safari).
DeleteDamn, thanks for letting me know. I've edited a few times/refreshed and relinked. I will try a bit more to troubleshoot but I'm not sure what the problem could be. Ack!
ReplyDeleteThis comment has been removed by the author.
ReplyDelete